ESP8266 remote power display for energy monitor – EV3 – 5V display

ESP8266 remote power display for energy monitor – EV3 documented an evolved design for a real power display using emontx3 / emonhub / mqtt. This article documents an adaptation to use a 5V display module (for higher brightness). The ESP8266 is not 5V tolerant, so a logic level converter is needed.

Hardware

The remote power display uses a Wemos D1Pro module, a common 5V 4 digit 14.2mm seven segment LED module with 74HC595 shift register per digit, and a common 3V/5V logic level converter between them.

Above, the Wemos D1Pro prototype with wires attached to the HSPI and power pins. A 1k pull=down resistor is soldered between the D8 and GND pins under the D1Pro board. Continue reading ESP8266 remote power display for energy monitor – EV3 – 5V display

ESP8266 remote power display for energy monitor – EV3

ESP8266 remote power display for energy monitor and ESP8266 remote power display for energy monitor – EV2 documented a design and some variations for a real power display using emontx3 / emonhub / mqtt. This article documents an evolution to use the ESP8266 HSPI port for much higher speed writing of the LED display, high enough to be later adapted for multiplexed displays.

Hardware

The remote power display uses a ESP8266-12E devkit 1.0 module, a common 3.3V 4 digit 14.2mm seven segment LED module with 74HC595 shift register per digit. The particular LED module has sufficient space to mount the ESP8266 inside the module.

Above, the interior of the module that suits the implementation. Continue reading ESP8266 remote power display for energy monitor – EV3

Inside the YHDC SCT013 current transformer

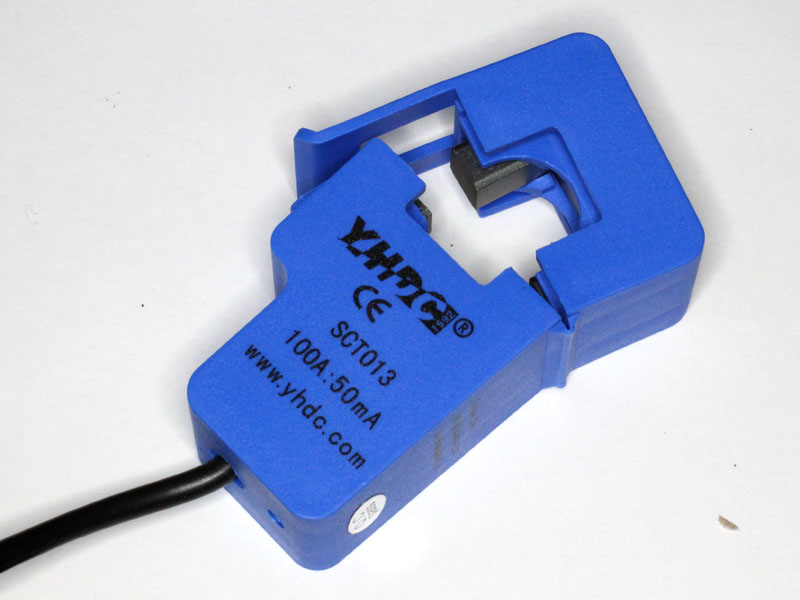
The YHDC SCT013 series is very popular for use in energy monitor projects.

Disassembly

Warning, the core is VERY hard, but VERY brittle, don’t hit it with anything hard, don’t grip in with pliers, don’t drop it on a hard surface.

The coil and half core are held in the lower housing by two obvious catches which click over the bobbin. Removal means pulling the assembly upwards gently whilst releasing the catches and feeding cable into the housing. One of the catches will probably catch on the slot in the bobbin, be prepared to release it.


An ideal tool for the purpose is an ordinary $2 DIP chip puller which can be used to get purchase on the two ears on the bobbin that can be seen in this pic. Push a little cable into the housing, pull upwards while releasing the catches, then feed more cable and the assembly is pulled upwards from the housing.

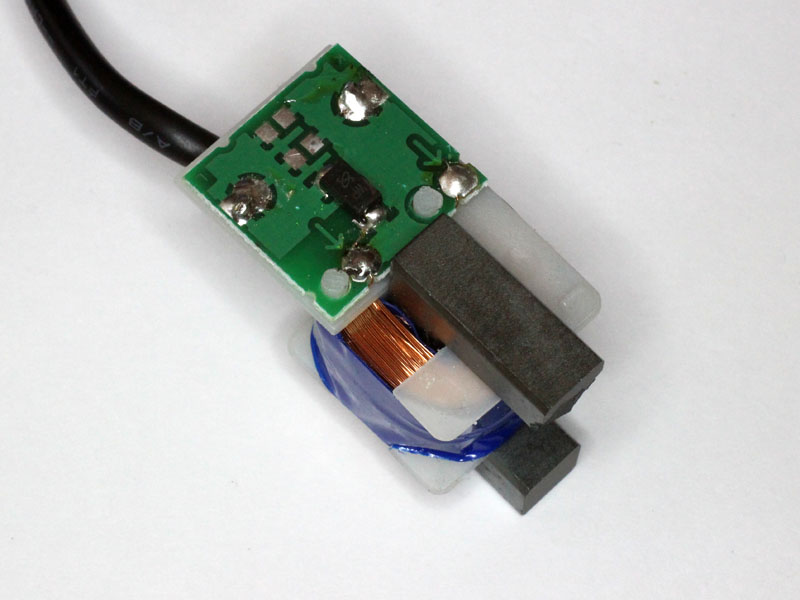
Above is the PCB detail. This one has a TVS (the black component) and no burden resistors. There is a place for two parallel 0806 burden resistors on the board.

The PCB floats on two plastic pin extensions of the bobbin. You may obtain benefit in securing it with two very small fillets of hot melt adhesive as above, small enough so as to not interfere with the guide rails in the enclosure.

Burden resistors

So if you wanted to add a burden resistor for 0.333V out at 50mA secondary current, R=0.3333/0.05=6.6667. You could do this with 1% resistors in the E12 value series, 12Ω and 15Ω will give the desired resistance. Likewise for 1V out, 22Ω and 220Ω in parallel will give the desired value of 20Ω.

If you wish to remove existing burden resistors, they can be removed with specialised tooling but small SMD resistors will usually melt the other side solder moments after melting the first side. Position a toothpick with one had to push the resistor sideways, with the other and use the soldering iron to eat one side to melt, move the soldering iron to the other side and push the resistor sideways with the toothpick as soon as both sides melt.

Protection

A CT that has no load could develop extreme and damaging voltage within the secondary winding in the presence of primary current. If the CT assembly does not have an integral burden resistor, it is wise to install a TVS or pair of inverse series 9V Zener diodes to prevent excessive voltage lest the external load be disconnected.


BG7TBL noise source

This is a review of the BG7TBL noise source available on eBay for about $20 incl post. I have seen this recommended in various online forums and thought it worthy of review.

A quick mention of Excess Noise Ratio (ENR), it is a commonly used measure of the characteristic of noise sources. A noise source for testing low noise RF amplifiers needs to be less than 10dB, 5dB is common; for other receiver testing around 15dB is common, and for massive output for filter alignment etc the noise needs to be well above a spectrum analyser noise floor so an ENR of 50dB might be appropriate (but such high noise output makes it useless for LNA noise figure measurement),

Above is the device. The layout is pretty simple, it is a Zener noise source at the left followed by three MMIC amplifier stages. The circuitry at mid left is a DC-DC converter to supply 25V to the Zener.

There are a host of aspects so far that are concerning:

  • there is no need to operate the Zener at such high voltage;
  • lack of regulation of MMIC power supply;
  • the noise output of the Zener source should be quite high; and
  • three stages of MMIC will give rise to huge output, notwithstanding the on-board attenuators at Zener output and final MMIC output.

Continue reading BG7TBL noise source

ESP8266 remote power display for energy monitor – EV2

See ESP8266 remote power display for energy monitor – EV3 for an update…

ESP8266 remote power display for energy monitor documented a design and some variations for a real power display display using emontx3 / emonhub / mqtt. This article documents a simple compact implementation.

Hardware

The remote power display uses a ESP8266-12E devkit 1.0 module, a common 3.3V 4 digit 14.2mm seven segment LED module with 74HC595 shift register per digit. The particular LED module has sufficient space to mount the ESP8266 inside the module.

Above, the interior of the module that suits the implementation. Continue reading ESP8266 remote power display for energy monitor – EV2

ESP8266 remote power display for energy monitor

This article documents remote power display for an energy monitor system based on emontx3 / emonhub / mqtt.

The remote power display connects via WiFi and subscribes to a topic on a MQTT server, updates are published every 10s with data from the emontx3 by emonhub.

Hardware

The remote power display uses a Wemos D1Pro ESP8266 module, a common 4 digit 14.2mm seven segment LED module with 74HC595 shift register per digit, and a simple 3V/5V level converter between the two (see above shrink wrapped in the cable from the D1Pro to the display).  Continue reading ESP8266 remote power display for energy monitor

Inductance of a loop of CAT5 pair

An online expert recently reported:

I tried to make an antenna loop for longwave with cat 5 and after it did no good I realized the twisted wires canceled each other out.

Or did they really cancel?

Parallel connection

I constructed a loop of one Cat 5 pair and measured its inductance when both wires are bonded at the ends.

The conductors are 0.5mm diameter and spaced 0.9mm. To estimate the inductance we use the geometric mean radius (GMR) as the equivalent radius of the pair. GMR=(0.5*0.9)^0.5=0.67, diameter=1.34mm. So let’s calculate the inductance of a single turn circular loop of 0.8m perimeter and round conductor of 1.34mm diameter.

The estimate above is 850nH.

Above is the measurement, the screen is not readable, but it is 852nH, very close to the estimated 850nH. Continue reading Inductance of a loop of CAT5 pair