One of the shortcomings or RPi for (m)any serious applications is that it lacks a hardware clock so when it starts, the clock is not set correctly.
This deficiency can be overcome to some extent for some applications with the fake-hwclock module and SNTP, but this is not a solution if the RPi is not always connected to a network time reference.
One solution is a real time clock module such as the DS1307, or better still the DS3231. The latter has an internal crystal with 2ppm (5s/month) accuracy from 0-40° which is much better than typically achieved with a DS1307 (which is dependent on the external crystal).
The first seven registers are identical, and there is no reason for Linux drivers to use register 0x07, so the DS3231 should be compatible with those drivers. Experience is that the DS3231 works fine with the DS1307 drivers.
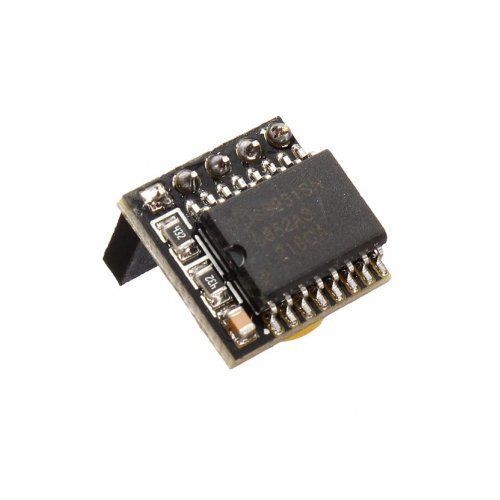 Above, a DS3231 based RTC purchased for $7 (incl post) on eBay. It is designed for the RPi, and plugs onto pins 1,3,5,7,9 of the GPIO header pins. The battery is barely visible underneath the board.

Note that deceptive Chinese sellers seem to often be supplying these things without a battery even though their pictures prominently show a battery. Ebay does not consider this a violation of their policies if the seller states somewhere that the battery is not included. The batteries are quite hard to source in Australia, but you can buy them in lots of 10 from Aliexpress… or just buy the whole thing with battery from Aliexpress. Be warned!
The steps required to configure the device for a R2 RPi are:
- Comment out the blacklist entry for the Broadcom chip’s I2C facility so that it can be loaded on boot. (sudo sed -i ‘s/blacklist i2c-bcm2708/#blacklist i2c-bcm2708/’ /etc/modprobe.d/raspi-blacklist.conf)
- Load the module for test (sudo modprobe i2c-bcm2708).
- Notify Linux of the RTC device (echo ds1307 0x68 | sudo tee /sys/class/i2c-adapter/i2c-1/new_device).
- Test (with the clock on your RPi set correctly, do hwclock -w to set the RTC, and hwclock -r to read it back – remember the RTC granularity is 1s).
For a R1 which has different pinout, at step 3 you will probably need (echo ds1307 0x68 | sudo tee /sys/class/i2c-adapter/i2c-0/new_device).
Update 15/05/2015: The above procedure may not be necessary or even work on newer kernels, try “sudo raspi-config” and select advanced options for an option to enable the I2C interface.
Update 20/06/2019: The above procedure may not be necessary or even work on newer kernels, try “sudo raspi-config” and select Interfacing Options for an option to enable the I2C interface. It seems it is necessary to list the following in /etc/modules: i2c-bcm2708, i2cdev, rtc-ds1307 (one per line).
The following method adds a SysV init file that will load the RTC early in the boot sequence.
Create a file /etc/init.d/ds1307 with a text editor and copy the following contents into it.
#! /bin/sh
### BEGIN INIT INFO
# Provides:          ds1307
# Required-Start:
# Required-Stop:
# Default-Start:     2 3 4 5
# Default-Stop:
# Short-Description: activates ds1307 rtc
### END INIT INFO

PATH=/sbin:/usr/sbin:/bin:/usr/bin

. /lib/init/vars.sh
. /lib/lsb/init-functions

do_start() {
        mkdir -p /sys/class/i2c-adapter/i2c-1
        echo ds1307 0x68 > /sys/class/i2c-adapter/i2c-1/new_device
        ES=$?
        sleep 1
        hwclock -s
        return $ES
}

case "$1" in
    start)
        do_start
        ;;
    restart|reload|force-reload)
        echo "Error: argument '$1' not supported" >&2
        exit 3
        ;;
    stop)
        ;;
    rc.d-add)
        update-rc.d ds1307 defaults
        ;;
    rc.d-remove)
        update-rc.d ds1307 remove
        ;;
    *)
        echo "Usage: $0 start|stop" >&2
        exit 3
        ;;
esac
Then set ownership and permissions (sudo chown root.root /etc/init.d/ds1307; chmod 755 /etc/init.d/ds1307).
Now set the links up to run it on boot (service ds1307 rc.d-add)
Reboot and you should see the RTC module activated early in the boot process in syslog. See the following example where the RTC is activated and the system time jumps.
Jan  1 10:00:35 u21 kernel: [   35.259160] i2c i2c-1: new_device: Instantiated device ds1307 at 0x68
Jan  1 10:00:35 u21 kernel: [   35.310886] rtc-ds1307 1-0068: rtc core: registered ds1307 as rtc0
Jan  1 10:00:35 u21 kernel: [   35.310954] rtc-ds1307 1-0068: 56 bytes nvram
Oct 17 09:27:13 u21 ...
You will want to uninstall fake-hwclock. Note that if you uninstall fake-hwclock, it does not remove the file /etc/fake-hwclock.data, you should remove that by hand.